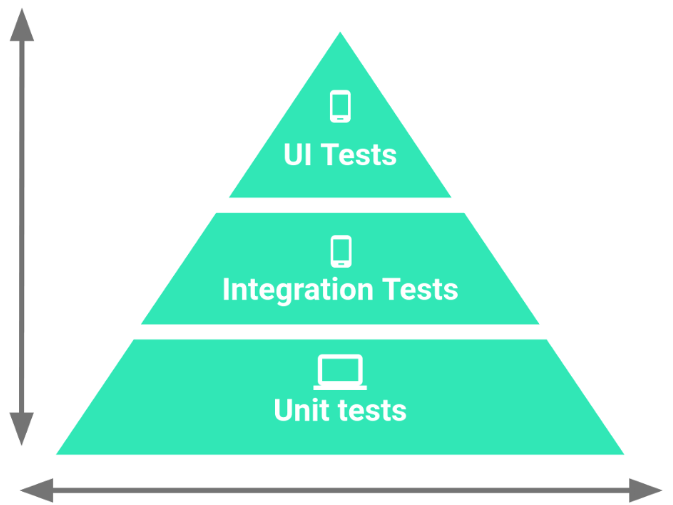
If you want to test a source code of an Android application, you should consider testing it in three different categories. Every category of Android testing levels is required to say with confidence there is only a small risk that something does not work correctly inside the app. Just check the test pyramid below to get a clear picture of what I am talking about.

What are the levels of testing in software testing?
You should always test the bottom level of the source code first, which can be done by using classic and straightforward unit tests to test the methods in java classes. In the Android testing process, these tests are called small tests, to be more formal.
The second level is integration tests with which you test interface and interaction between two (or more) different components; that kind of test is called medium tests. The last level is large tests and they test use cases, API calls, and similar more complex features in your app.
What is Android unit testing?
So let’s start with a unit test. What do you need to execute it? Well, nothing special. That kind of test you can execute on your computer. You don’t need to execute it on an Android device or some emulator. It tests just pure java code, and that is done on a computer because it does not need to use Android SDK or any Android operations. Because of that, unit tests are fast, and you can use them whenever you want since it’s a quick and straightforward process.
For example, integration tests use Android SDK, so you don’t have a choice, you have to execute them on an Android device or emulator. That means they are a bit slower than unit tests since you have to wait for the app to build on a device (or emulator).
However, it does not matter whether tests execute fast or slow; we need them all. If we write only unit tests because they run faster, we can’t have confidence that the source code is written well. Every level of tests has different characteristics, which makes them unique, and it’s never a good decision to skip some of them. I mean, it’s not only a problem if you have unit tests but miss integration tests. It’s also a problem vice versa (having integration tests but without unit tests).
In that example, you can be sure that your components communicate together as they should, but there is no way to ensure that simple methods in every element work correctly. Long story short, you need to write all three levels of tests. It should always be a combination of small, medium, and large tests. In official Android documentation, we found a recommendation on the percentage of tests every level should have:
-
70% small tests
-
20% medium tests
-
10% large tests
Small level tests
The lowest level of the test is unit tests. They execute on a computer, so you don’t need a device or emulator and they are used for testing pure java methods and source code. With these tests, you can be sure that your methods do what they need to do.
The best advantage of these tests is that they execute fast because there is no need for Android OS or SDK. However, there is a problem of not being sure whether your app is doing what it should on a higher level, so you can’t have only these tests and say you have tested the app.
When you write unit tests, you should be aware that they should be used only for pure Java source code, and no Android SDK interactions should be included. Of course, we all know that it is really complicated to write source code for Android apps without interaction with SDK.
Because of that, you should use Mockito that will enable you to call methods from Android SDK but without actual implementation. Otherwise, if you want and need to use Android SDK methods, you should use Robolectric.
Medium level tests
After you wrote small level tests, it’s time for the upper level. So, medium-level tests can tell you if your app components interact with each other in the right way or if they don’t. The answer to that question you should find out that with this level of tests.
The bad thing about this kind of test is that they execute slower than unit tests. The reason behind that is the fact they use Android SDK while performing, but, on the bright side, we can use Android SDK while writing it. So, the most popular use cases for testing are some API tests, databases, forms, etc…
Large level tests
The highest level of tests on Android is the large test level with which you test use cases. Large tests are slow, and they need an Android device or emulator for execution since only with them we can test the app in a way the user sees it. Here you should test UI components, and to do that, you can use the Espresso library that will help you make a whole process much easier and smoother.
Which tests are generally performed in Android application?
My two cents: Most Android dev teams use only one level of tests, most time only a small level. Is that wrong? Well, you know, it’s better than nothing, but there is not enough to be able to say with confidence that your app has tested. That kind of test can help, but in the name of software quality, it is nothing.
Our recommendation for Android testing levels use is always to use all levels in the needed percentage. That way, quality is the priority.
